Wednesday, December 26, 2012

How important is clay for a glaze?

I recently made tests of clay for Pro-Pec Company. All tests in this presentation are made from EIGHT different clays and fired in electric kiln to 1227°C with our hold at the end and controlled cooling. They are all glazed by ONE glaze, one dip. All were place on same shelf in the kiln.

I leave the answer of the question in title on you…


Sunday, December 23, 2012

Caligraphy or just any brush will do

To most than 90% of my work is glaze applied by brushing. I realized that not only it is great tool to control exact thickness of glaze applied, but also brush is great tool to decorate the pot with glazes, which vary its results depend on their thickness. With the time I started looking at brushes differently, I take any brush I can get hands on and learn what it can do for me, what decoration is by each one possible depending on how much glaze I put on it, in what thickness the glaze need to be, how much pressure I need to apply to a brush to do the decoration I like. With experiment quit interesting results start emerging...


There might be even times in future, when I reach for this brush... sees what it can do...


Using phone card as a decorating rib


I use phone cards or any kind of old cards to simply cut any shape I want and decorate my pottery with it.


I cut them number of times until they are so small, that is not possible to use them anymore. 


Drying tiles

About one year ago, we have got a visit from our old friend. He just recently visited another potter, Mr. Dorda, who is author of the recipe for my beloved clay. My friend was very happy to have chance to visit this potter, he among all other stories from Mr. Dordas workshop describe also a technology, which this potter uses to build his forms.

He use ytong bricks as a base for his forms as it is a much easier material to create certain forms with than gyps and with, in some way, even better characteristic than gyps. Afterwards this base form is given gyps coating.

The moment I heard this, I kind of knew my problem with drying tiles or large flat work has been solved; I vent to our shed and brought some ytong bricks 5cm thick. I place them on flat desk and cover them with fabric – I later realize that fabric was a better choice for my situation, than coating ytong bricks with gyps as I single fire all larger pieces (my electric kiln for bisque is only 32cm in diameter) and that mean I also glaze them, when they are leather hard. I do glazing after moving the piece onto the ytong bricks. I let the glaze stiffen to leather dry and then I cover the piece with another fabric and place another ytong brick on top of the tile or inside flat bottom piece. Fabric can be removed after loading the piece into kiln and wash form glaze.


I leave it for about a week and when I uncover it, it is usually almost dry. Does not need to exchange or turn around, like when one used drywall. Ytong bricks are very easy to cut in any size and material from those bricks is not hazard inside pottery as gypsum is.


New pottery arriving out of necessity

Construction


Our 3rd kiln, but the 1st one on our new property has 850 liters; we use it to fire our pottery. We also build another one, smaller, 320 liters for students to use and learn to woodfire. The bigger one I still call punk as it is not done yet and as the time goes, I get the feeling that it never will be this kind of clean finish kiln you can see on some photos in books. It was built on the edge of winter 2010 and it took us 14 days from laying the concrete as a foundation for kiln to unload the kiln. I personally would not recommend this speedy building, unless one really has to, not just because it was exhausting, there also was steam all over the kiln, when we first time preheated.

Unloading surprise


When unloading this kiln for the first time, we noticed that two bottom floors reached much lower temperature than we expected. We assumed that partly the moisture in kiln might have been responsible or just that it might be new feature of this kiln, which was larger than our old one in same construction.

New technique

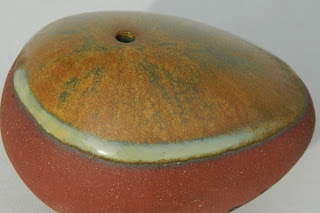
We decided to use the bottom floor for the technique, which was introduced to us by USA potter Eric Knoche. Similar technique is also used in Japanese kiln in Bizen area.

After reaching final temperature (after the cones 1350°C in front of kiln and 1250°C in back of the kiln goes down) we open the bottom floor and fast fill it with the charcoal. It achieves local reductions and effects, we liked very much on pots, which we have seen done by this technique. Of course we have just heard how this technique is done, we actually never really seen it done, so we did not know not only if it is going to work with our clays, but also if we do it right.

And at the end

We never thought about this since, we do not care if we do it right, we just do it. We love the results, the experiments with clays, slips, certain types of glazes and the adrenalin in the end of our firings.


Friday, December 21, 2012

Small woodkiln to start with

This particular kiln has been made for woodfiring promotional purposes. We have fired this kiln on opening anniversary of Kutna Hora tea room in front of the tea room on the Jungmanovo square. After that we use kiln for two day workshops.


From information above is clear that the kiln can be fired fast (about 7-8hours- one could go faster, but remember we never fire kiln, we fire the works inside!!!) and also cools quit fast. If firing start at about 15.00 (firing finished at about midnight) - it can be unloaded at about 16.00 next day.

Kiln is made from soft bricks and is about 150liters chamber for vessels.

It can be easily fired to cone 9- cone 11 - there are differences in the temperature in front of kiln and beck, also top to bottom).

Kiln can be fired by one person and is suitable for occasional wood firing. This kind of kiln can be also made larger (we ourselves had similar design upgraded a bit with cca 450liters chamber for vessels, now we have one, which is 850liters). So the dimension of one brick (250cmx125cmx65) is pretty much a guideline, but does not have to be kept precisely. Even the 450liters one is easily fired by one person - it also can be fired fast (8hours), but from experience we have found that is best to be fired for about 12hours). With larger kiln the right choice of clay + glaze in different parts of kiln is crucial.

All kilns made from soft bricks need roof over it.

One of the main advantage of this kiln is that it is not only easy to build, but also easy to repair and easy to upgraded - mean if you realize you would like to have bigger kiln you just take the kiln apart - get some more bricks and build bigger.

If you would like more additional information, you can contact us.